If you’ve ever wanted to learn about the HubSpot lifecycle stages, now is your chance! In this article, we’ll be taking a deep dive into what each stage of the lifecycle is for and what tasks are involved. We hope that by the end of this post, you will have a better understanding of how to use the HubSpot lifecycle stages in order to best help your business.
In this post, you will learn:- What an HubSpot lifecycle stage is?
- What is the importance of HubSpot lifecycle stages?
- What are the lifecycle stages in HubSpot?
- Where can you use HubSpot lifecycle stages?
-
Can we add custom HubSpot lifecycle stages?
-
Benefits of customizing HubSpot lifecycle stages
- How to add custom lifecycle stages in HubSpot?
What is a HubSpot Lifecycle Stage?
HubSpot lifecycle stage is simply used to track where your prospect or lead is within the sales cycle. HubSpot lifecycle stages help marketers precisely target prospects through marketing approaches considering the lifecycle stage of contacts and make sure that the leads move through every stage of the sales cycle until they end up becoming a customer.
When you first start using HubSpot, you’ll notice that your leads automatically appear within the lead lifecycle stages. This is because HubSpot uses algorithms to determine where leads are within the sales cycle.
However, you can also move leads manually between the lifecycle stages or create new ones as well.
What is the importance of Lifecycle Stages in HubSpot?
With a marketing plan, it's important to come up with a strategy that will get your company more customers and make it stand out from the competition. This is where lifecycle stages come into play. Lifecycle stages help you to streamline your marketing efforts, thus making them exponentially more effective. Every marketing campaign should be tied to a HubSpot lifecycle stage so that relevant content can be presented at each step of the customer journey.
First, if you have multiple salespeople or customer service representatives servicing different customers who aren't on the same lifecycle stage, they may give out contradicting information. For example, customer service might tell one person that there is no promotional offer running when in fact there is. Or salespeople might showcase a customized product plan that each contact doesn't need.
If you have multiple people needing to get in touch with your company, then this will become more of a problem. The second reason why Hubspot lifecycle stages should exist is because they'll allow you to increase the frequency of communications. This may not seem like much, but you can't constantly be selling. It's a waste of resources and it can be overwhelming for some customers. With the right lifecycle stage, you can send the right information to the right contacts at the right time.
HubSpot Lifecycle Stages help you improve the effectiveness of cross-sales and up-sell programs. If you know which products and services a customer is interested in based on his lifecycle stage, you can make better suggestions for other related products and services that will help him become even more productive with your company's solutions.
What are the Lifecycle Stages in HubSpot?
There are 8 main lifecycle stages in HubSpot CRM by default. These include:
- Subscriber
- Lead
- Marketing Qualified Lead
- Sales Qualified Lead
- Opportunity
- Customer
- Evangelist
- Others
1. Subscriber
A subscriber is a contact who has signed up on your website to receive your latest blog updates or newsletter. HubSpot automatically sets this lifecycle stage when a contact converts on a blog subscription form. Further, it can be created through a conversation, or manually created in the contacts index page.
2. Lead
A Lead is someone who has converted on your website or through some other interaction with your organization beyond a subscription sign up. This is automatically set by HubSpot when a contact converts on a lead form, is synced to HubSpot from Salesforce, or is created from a contact profile in Gmail or Outlook.
3. Marketing Qualified Lead
a contact that your marketing team has qualified as ready for the sales team.
4. Sales Qualified Lead
a contact that your sales team has qualified as a potential customer.
Lead Status
The Lead Status property describes the sub-stages within a Sales Qualified Lead lifecycle stage. The default Lead Status options are:
- New
- Open
- In Progress
- Open Deal
- Unqualified
- Attempted to Contact
- Connected
- Bad Timing
5. Opportunity
a contact who is associated with a deal (e.g., they're involved in a potential deal with your organization). If you've selected to Sync lifecycle stages in your settings, this is automatically set by HubSpot when a contact or company is associated with an open deal.
6. Customer
a contact with at least one closed deal. If you've selected to Sync lifecycle stages in your settings, this is automatically set by HubSpot when at least one deal associated with the contact or company is set to Closed Won.
7. Evangelist
a customer who has advocated for your organization.
8. Other
a contact who does not fit any of the above lifecycle stages.
Where can you use HubSpot Lifecycle Stages?
The Lifecycle stage property can be used to segment your records when creating a list or a saved view. You can also use reports in your HubSpot account to see where contacts are in your processes and how they have moved between the lifecycle stages.
Best Practices for HubSpot Lifecycle Stages
When deciding on a lifecycle stage, there are four primary considerations:
1. Simplifying your communications
Larger companies often communicate through email on a quarterly basis, while small businesses might send more frequent emails as part of an ongoing relationship with their customers. To simplify your communication efforts, you could choose to define multiple lifecycle stages for different customer segments (e.g., first time sales, repeat buyers, etc.) and/or different product lines (e.g., technical support information for computer network administrators or product comparison information for newbies).
2. Enabling segmentation
HubSpot Lifecycle Stages allow you to focus your communications on only those contacts that are most likely to produce business results. An example of this is a company that sells multiple products and services. If it simply sent emails to everyone equally, the customer who bought the least expensive product may get more emails than the one with most potential for future sales, driving him away from your company.
3. Reduced costs
Wasting less money advertising through channels such as search engines and social media for people who have no current interest in your products or services. Lifecycle stages can be used to eliminate these marketing costs by eliminating unnecessary communications with people who have not yet entered a sales cycle (first time buyers).
4. Understand customers
Observing what kind of customer information would be most helpful and useful for the various types of customers that your company serves. There's no point in having detailed data on one type of customer and then sending them generic information about another type.
Can we add custom HubSpot Lifecycle Stages?
HubSpot allows companies to add their custom lifecycle stages to the customer journey. Companies can categorize their contacts in whatever way makes the most sense for their business, which can be especially valuable when applying marketing automation strategies.
Benefits of customizing HubSpot Lifecycle Stages
We've found that there are a few key advantages to using lifecycle stages when marketing automation. The biggest advantage is the ability to create micro-segments which, in turn, allow for more personalized communication based upon the user's needs at any given time. The other major advantage is that it allows companies to use events to trigger email campaigns at specific points in the lifecycle stage – like a customer who has just downloaded an e-book or requested a demo. Without custom HubSpot lifecycle stages, these kinds of triggering events would be impossible.
How to add custom lifecycle stages in HubSpot?
Adding custom lifecycle stages in HubSpot is pretty easy. After login to your account, simply click on the Gear Icon and select properties section in the left pane. Click on "Create property". A modal window opens up on the right side of the screen.

Give a label to your property "Custom Lifecycle Stage" and click on "Next".
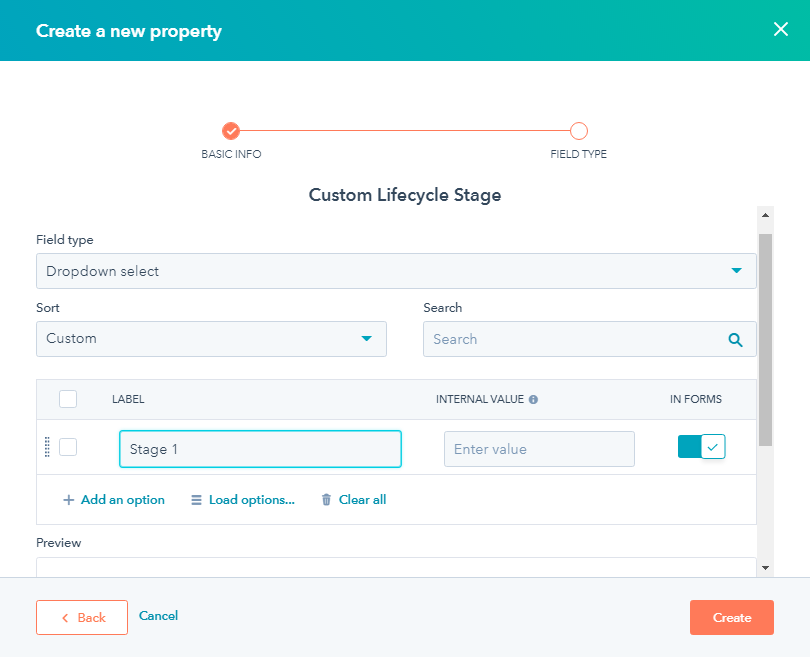
Select the field type as "Dropdown select" and add lifecycle stages such as "Stage 1", "Stage 2" and more. Once you add the lifecycle stages, click on "Create" to add your custom lifecycle stages to HubSpot CRM, and you are all set!
HubSpot also lets you track your various lifecycle stages and create reports using those stages at a very detailed level. You can embed these reports in many different places on your HubSpot website like blogs, landing pages and websites.