If you want to stay current with the latest trends in HubSpot web development, you should definitely check out HubSpot CMS Modules. These modules are the building blocks that make both the development process and the user experience much better on HubSpot. If you're not familiar with them yet, this article is here to help you get up to speed!
What are Hubspot CMS Modules?
HubSpot Modules are a great way for designers and developers to create unique sections of a website. HubSpot CMS comes with default modules. However, designers and developers can create their own HubSpot Custom Modules to meet their web requirements.
The sections, created by these modules, stay consistent across different pages, but the cool part is that they can also be easily customized by marketers and non-coders using the HubSpot Drag & Drop Editor. This is super handy when you have content that's a bit different on each page but still needs to look the same, like featured content HubSpot modules or lists of related products.
It's like a customizable toolkit for making your website look awesome without needing to dive into complicated code!
Benefits of Using HubSpot Custom Modules
Now, here’re the advantages of leveraging HubSpot Custom Modules for enhanced website design and streamlined content customization. Explore how these modules bring efficiency and consistency to your marketing efforts.
Easier To Edit and Update
Once your Custom Module is coded and configured, publish it and include it in any template. When applied to a template, the module's design will automatically appear on every new page created with that template. Marketers and non-coders can easily edit custom fields on each page. The user-friendly layout in the HubSpot Editor simplifies the editing process, offering a unique experience for template adjustments.
Less Clutter on Your Templates
Custom HubSpot modules offer a maintenance advantage by streamlining HubSpot Templates and reducing clutter. Rather than piecing together multiple modules, a single Custom Module can incorporate various custom features, maintaining a cleaner Design Manager for the template while delivering the same user experience.
Reusable Modules For Complicated Development
With Custom Modules, you can keep everything within the HubSpot platform, managing styles, HubL, and Javascript seamlessly. These modules also provide specific areas where non-technical users can easily tweak parameters, making it ideal for creating custom website sections that are both powerful and user-friendly. Dive in, experiment with your ideas, and uncover the multitude of possibilities!
8 Things to Know About HubSpot CMS Modules
Dive into the core aspects of HubSpot CMS modules with this comprehensive guide. Uncover eight essential insights that illuminate the power, flexibility, and strategic impact these modules bring to web design and content creation.
Reusable Components
HubSpot CMS modules revolutionize website design by being reusable building blocks. These adaptable components seamlessly fit into templates, providing a flexible way to construct pages. Whether placed in specific templates or added through drag-and-drop, modules empower users to efficiently enhance web pages while maintaining a consistent and professional appearance. This approach not only simplifies design but also ensures a unified look across the entire website.
The modular method marks a significant change, freeing designers from redoing similar elements for each page. Instead, they can use and adjust modules as needed, fostering a more flexible and scalable web design process.
Dual Components
HubSpot modules offer a unique blend of user-friendly design and robust technical elements. On one side, there's an easy-to-use interface for content creators, making editing a breeze in a familiar environment. On the other side, there's an HTML+HubL template, enriched with CSS and JS, shaping how the website looks and behaves. This setup allows developers to handle the technical coding, defining structure and behavior, while designers focus on creating an appealing user experience. This collaboration ensures a seamless blend of technical prowess and visual design, resulting in a website that's both functional and visually engaging.
Developer Flexibility
In the HubSpot CMS world, developers have the freedom to create modules using local tools or the Design Manager. They can customize modules to fit their project's unique needs and explore a hub of ready-made modules on the HubSpot Marketplace. This flexibility not only speeds up development but also fosters collaboration, letting developers tap into each other's expertise and contribute to a shared pool of useful modules. This blend of customization and pre-made solutions ensures developers have the efficient tools they need to bring their ideas to life.
Content Creator Customization
HubSpot CMS modules make it easy for both developers and content creators to work together. They offer customization options designed for non-techy folks, allowing content creators to personalize content without dealing with complex code. Plus, by integrating free HubSpot tools like reporting, forms, live chat, and CTAs, content creators can add interactive and data-driven elements to enhance the user experience.
This collaboration between developers and content creators establishes a smooth workflow, leveraging the strengths of each role to create a unified and engaging online presence. Content creators can make impactful changes without messing with the code, fostering a collaborative environment that empowers everyone involved.
Organized Management
As you accumulate more theme modules HubSpot in your CMS setup, keeping things organized becomes crucial. HubSpot acknowledges this and offers robust features in the Design Manager for efficient module organization. Folders, labels, and permissions create a structured system, letting teams categorize and control access to modules. Plus, the option to clone, export, and import HubSpot modules ensures smooth collaboration, providing backups and facilitating easy sharing across various projects.
These organizational features in the Design Manager simplify the development process, offering a streamlined approach. Teams can easily navigate and manage their growing module library, ensuring each module is strategically deployed in line with the broader design strategy.
SEO Optimization
HubSpot CMS modules go beyond design, impacting SEO optimization directly. The built-in SEO tool in HubSpot empowers content creators to boost module visibility on search engines. It covers everything from optimizing titles and meta descriptions to refining headings and keywords. This integration simplifies SEO for content creators, allowing them to manage content and search engine visibility in one place, eliminating the need for separate SEO tools and ensuring a cohesive approach to online presence.
Content Strategy Alignment
HubSpot CMS modules seamlessly integrate with strategic content planning through the Content Strategy tool. This tool empowers content creators to plan and execute content strategies, including the creation of topic clusters and pillar pages. By weaving modules into these strategic content structures, content creators can ensure their modules contribute meaningfully to overall content goals, delivering a cohesive and purposeful user experience.
The Content Strategy tool becomes a guiding force for content creators, aiding in conceptualizing and implementing a content architecture that optimally leverages the capabilities of HubSpot CMS modules. This alignment ensures modules aren't standalone elements but integral components of a broader content strategy.
Web Performance Analysis
HubSpot equips content creators with powerful analytics tools, such as Web Analytics and Traffic Analytics, to assess module performance. These tools provide valuable insights into web traffic, conversions, and engagement specific to each module. By tapping into these analytics, content creators can gauge module effectiveness, pinpoint areas for improvement, and fine-tune their content strategy based on user behavior.
The integration of web performance analysis in HubSpot allows content creators to make decisions backed by data. It offers a comprehensive view of user interactions with modules, enabling continuous refinement and optimization for enhanced overall web performance.
Create and Edit HubSpot Modules
In the Design Manager tool, you have the power to craft custom coded modules, enhancing the capabilities of your blogs, pages, or emails. These custom theme modules HubSpot provide a diverse set of functionalities, enabling you to fully customize content directly within the page, email, or blog editor. It's a versatile way to add advanced features and tailor your content to meet specific needs.
.png?width=892&height=357&name=MicrosoftTeams-image%20(21).png)
Adding a New Module:
- Go to your HubSpot account and click on Marketing > Files and Templates > Design Tools.
- In the finder, at the top, click on the File dropdown menu.
- Select "New file" from the dropdown options.
.png?width=877&height=367&name=MicrosoftTeams-image%20(18).png)
- In the dialog box, click the "What would you like to build today?" dropdown menu and choose "Module." Click Next.
.png?width=770&height=386&name=MicrosoftTeams-image%20(20).png)
- Check the boxes next to the types of content where you want your module to be applied: pages, blog posts, blog listings, emails, or quotes. Note that theme modules HubSpot for email templates cannot contain CSS or JavaScript.
Keep in mind that creating custom modules for emails requires a Marketing Hub Professional or Enterprise subscription.
- Decide if your module will be local or global. Global modules update everywhere they are used when edited.
- Enter a file name for your module and click Create.
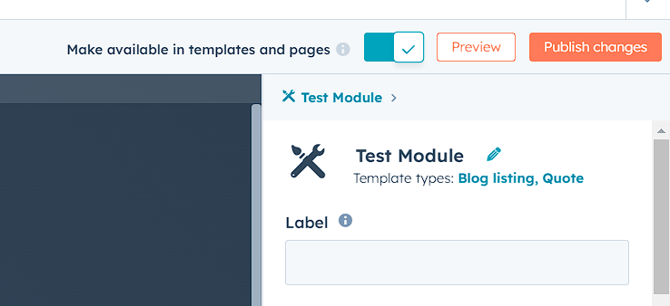
Naming Your Module
To customize how your module is referenced in the content editor:
- By default, the content editor uses the name assigned in the Design Manager.
.png?width=768&height=582&name=MicrosoftTeams-image%20(19).png)
- If you prefer a different name in the content editor, enter a label for your module. This label is what will be used for reference in the content editor.
Adding Fields to Your Module
To make your module's content or styling editable in the content editor:
- In the module inspector on the right, locate the Fields section. Click the "Add field" dropdown menu.
- Select a field type from the options available. These fields allow you to specify what can be edited in your module. To explore the types, refer to the developer documentation.
This step enables you to incorporate versatile editing capabilities for your module in the content editor.

Change your field name by clicking the pencil icon next to it. If you want to adjust the HubL variable name, simply make your changes in the provided text field. This gives you the flexibility to customize how your module's fields are named and referenced in a user-friendly way.
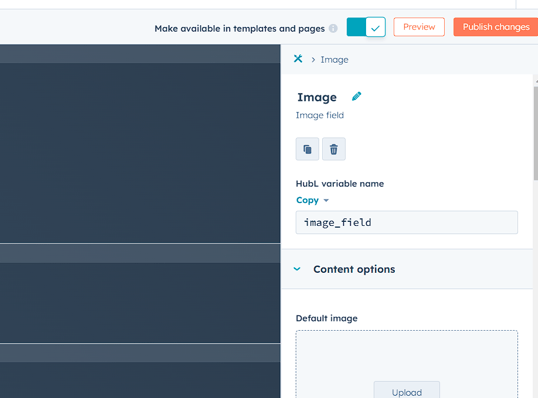
Add Field Default Content
In the Content Options section, you can set default content that shows up when using the module in templates and content editors. The available options depend on the type of field you're working with.
.png?width=606&height=552&name=MicrosoftTeams-image%20(17).png)
For instance, if it's an image field, you can choose a default image and decide whether to hide size controls. This way, you ensure that your module starts with the right content without having to input it every time.
Set Field Editor Options
In the Editor Options section, you have some handy features for how users can interact with your module in the content editor.
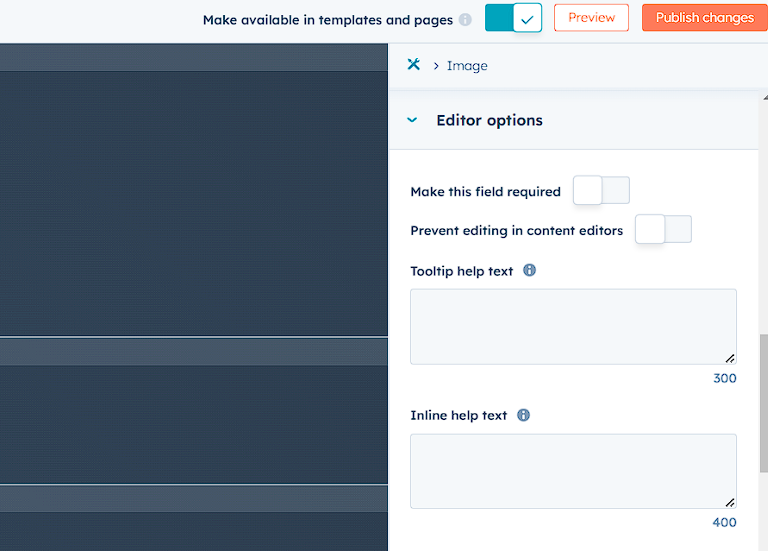
- Make this field required: Users must fill in this field; they can't leave it blank.
- Prevent editing in content editors: Field content can't be changed in the content editor but remains editable at the template level. Note: This doesn't apply to global theme modules HubSpot which can't be edited on a page-by-page basis.
- Tooltip help text: You can add helpful hints or instructions to the field. Users will see this information in a tooltip when they hover over the field while editing.
- Inline help text: Similar to tooltip help text, you can provide context or instructions. This information appears below the field while users are editing the module. These options make it easier for users to work with your module effectively.
Set Field Display Conditions
To make a module field appear only under specific circumstances, use field display conditions:
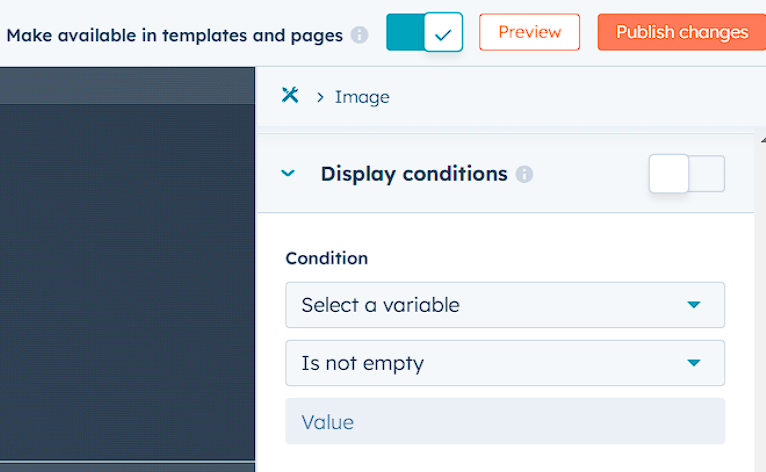
- In the Display Conditions section, choose a module field from the HubL variable dropdown menu.
- Click the dropdown next to "is not empty" to specify the condition for that field.
- If you select "is equal to," enter a value or regex.
- For instance, in the example below, an image field will only show up if a text field named "image_title" has a value equal to "Headshot."
Display conditions are automatically activated once set. To turn them off, click the toggle switch next to Display Conditions. This feature gives you precise control over when your module fields are visible based on specific criteria.
Tailor Your Module with Repeater Options
In the Repeater Options section, you can customize how fields are repeated in your module. Here's how:
.png?width=740&height=463&name=MicrosoftTeams-image%20(16).png)
- Choose the number of instances required for your field by setting a minimum and/or maximum.
- Opt for a default object count, determining how many instances of the field will initially appear in the module.
For example, if you're creating an image slider, you might set a minimum of 3 images, a maximum of 5, and a default of 4. This means users will start with 4 images in the module but can add or remove within the specified limits.
Repeater options activate automatically once modified. To turn them off, click the toggle switch next to Repeater Options. This feature provides flexibility, allowing you to control how many instances of a field can be added or removed in your module.
Organize Your Fields with Groups
Once you've created fields, you can group up to 4 of them for better organization and to build custom field logic. Here's how:
- In the right sidebar of the module editor, click on "Group."
- Choose the fields you want to group together.
- Click "Create group."
This feature allows you to keep related fields organized and build logical structures within your module. For more details, check out information on module field groups.
Copy and Paste your Field Snippets
When you're ready to include a field in your module code on the middle section, follow these simple steps:
- In the field inspector, click "Copy snippet" beside the field's HubL variable name.
- If you're in the module inspector, hover over the field, click "Actions," and choose "Copy snippet."
- Navigate to the spot in the HTML + HubL editor where you want to insert the field.
- Paste the snippet by pressing Ctrl+V (Windows) or Cmd+V (Mac).
This straightforward process allows you to seamlessly integrate fields into your module, enhancing its functionality.
Write your Module Syntax
As you work on your module, you can incorporate extra module syntax using the HTML + HubL, CSS, and JS editor panes. To delve deeper into the module code editor and explore module syntax, refer to HubSpot's designer documentation. This resource provides valuable insights into crafting advanced functionalities for your module.
Add Help Text to your Module
To assist users as they edit your module, follow these steps in the Editor Options section:
.png?width=572&height=382&name=MicrosoftTeams-image%20(15).png)
- Add concise help text, providing context for users. Note that the text should be no longer than 300 characters.
- When users edit the module in a content editor, the help text will display above the module fields.
This feature ensures that users have helpful context and guidance while making edits, enhancing the overall user experience.
Publish your Module
When you've finished adding fields and writing your module code, it's time to publish. Simply click "Publish changes" in the upper right corner. This step makes your module live and visible for use, completing the editing process.
Make your Module Available for Templates
- Enable the "Make available for templates" toggle at the top right to include this module in your templates.
Turn it off when you want to modify or test the module. If the toggle is off, your team will receive an alert indicating that the module is not available for templates. This toggle gives you control over when the module is accessible for template use.
Add Your Module to a Template
Once you've published a module, you can use it on multiple pages by incorporating it into a template. This allows you to maintain consistency and easily apply the same module design across various pages on your website.
For Drag and Drop Templates:
- Open the template layout editor.
- Click the "Add" tab in the layout inspector.
- Search for your module, identified by the custom module icon (custom Modules).
- Drag and drop the module into the template.
For Coded Templates:
- Copy the module snippet.
- From the module editor, click "Copy snippet" at the bottom of the right sidebar.
- In the design manager's left sidebar, right-click the custom module and select "Copy snippet," or click "Actions" and choose "Copy snippet."
- Paste the snippet in your coded template where needed.
This process allows you to seamlessly integrate your module into different types of templates, whether they are drag and drop or coded.
Conclusion
HubSpot CMS modules serve as dynamic building blocks that seamlessly integrate into web design, offering flexibility, collaboration between developers and content creators, and robust tools for organization, SEO optimization, content strategy alignment, and performance analytics. These modules empower users with a user-friendly interface, allowing for efficient content customization without compromising on code integrity. With HubSpot CMS modules, the HubSpot web development process becomes streamlined, agile, and strategically aligned, ensuring a cohesive and impactful online presence.